Search This Blog

Sunday, 13 August 2017

How To Restore Your Default File Format And Icons.

Have you ever messed up your Default File Format And Icons by using open with option?
Now you don't have to worry anymore as I have come up with new idea and proper explanation.
In this video you will learn how to bring back to your default file format and icons. Please make sure that you follow the exact steps.


The steps are:
  1. First click any of your messed up file or application, then go to properties to check the file extension. Eg: Your file extension could be .Ink or .dll…. etc.  
  2. Now click the start menu and type in regedit.                                                                                    (Locate your .Ink or .dll or any file extension folder by doing the following...
  3. Click on HKEY_CURRENT_USER.
  4. Then go to Software.
  5. Then Microsoft.
  6. Then Windows.
  7. Then CurrentVersion.
  8. Then Explorer.
  9. Then FileExts.
  10. Then look for your file .Ink or .dll or any file extension.
  11. Then double click OpenWithList folder.
  12. Then delete everything under the "Default" key in the OpenWithList folder.  Imp Note:- Make sure you don’t delete the (Default).
  13. Delete the entire UserChoice folder.
  14. Close the Registry Editor.
  15. Hold Alt+Ctrl+Delete for windows 7 on your keyboard and click on the Processes tab in the Windows Task Manager.
  16. Find explorer.exe and click end process.
  17. Go to File and then New Task (Run...).
  18. Type in C:\Windows\explorer.exe into the search box and press Enter.
  19. Close Windows Task Manager and you're done!.

Video Link Here :-☺↓

https://www.youtube.com/watch?v=PiQ84xZ7ssI

Find WiFi password in Windows 10 Using CMD Command

Find Wi-Fi password with Command Prompt

You can also use the command prompt to find the WiFi key. To do so, from the WinX Menu, select Command Prompt, type the following and hit Enter:

netsh wlan show profile name=YOURWIFINAME key=clear


Here, in place of YOURWIFINAME, you have to type the name of your WiFi connection.
You will then be able to see the WiFi password under Security settings > Key Content.
Trust this works for you!

System File Checker: Run sfc /scannow & analyze its logs in Windows 10/8/7

The System File Checker or sfc.exe is a utility in Microsoft Windows located in C:\Windows\System32 folder. This utility allows users to scan for and restore corrupt Windows system files. In this post, we will see how to run System File Checker and also see how to analyze SFC logs.

System File Checker

In Windows 10/8/7/Vista, the System File Checker is integrated with Windows Resource Protection, which protects registry keys and folders as well as critical system files. If any changes are detected to a protected system file, the modified file is restored from a cached copy located in the Windows folder itself.
So if at any point of time if you find that you have hacked some system files or maybe applied some tweaks or replaced system files, maybe while customizing your Windows, and you now find that your Windows is not working properly, you may want to consider running this utility first, before trying a System Restore. To do so, you will have to first open an elevated command prompt window.
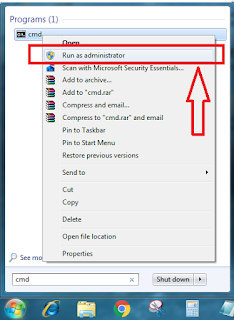
To run the System File Checker in Windows 10/8/7, type cmd in start search box. In the result, which appears, right click on cmd and select Run As Administrator.

Run sfc /scannow

In the command prompt window which opens, type sfc /scannow and hit Enter.

How to Find Out the Date and Time When Windows was Installed in Your Computer?

  • METHOD 1: Using SystemInfo Command in Command Prompt
  • The above mentioned method might not provide the exact and correct date and time of Windows installation but you can use following Command Prompt method to get the original date and time when Windows was installed:
    1. Open Command Prompt as Administrator using any method given here.
    2. Now run following command:
    systeminfo
    It'll take a few seconds in running some tests and you'll get a detailed information in the result.
    3. Scroll upwards a little and look for "Original Install Date" section. It'll show the correct date and time of Windows installation in your system.
  • You can also take help of '|' parameter to direct find and show the Windows installation date and time via systeminfo command.
    Just run following command in Command Prompt:
    systeminfo | find /i "date"

How to Make Your PC Auto Shut Down Any Time


It’s good to to power off your PC when you’re not using it, but do you ever forget and leave it on? Here’s how to configure Windows to automatically power down at night, but only if you’re not using the PC at the time.


Click Start, type “task scheduler,” and then click the “Task Scheduler” app.
In the Task Scheduler window, in the “Actions” pane, click “Create Task.”
On the “General” tab of the Create Task window, give the new task whatever name you want. We like putting a “z_” before any user-created tasks just so that they’re easier to find later with a quick alphabetical sort. Select both the “Run whether user is logged on or not” option and “Run with highest privileges” options. On the “Configure for” drop-down, select your version of Windows.
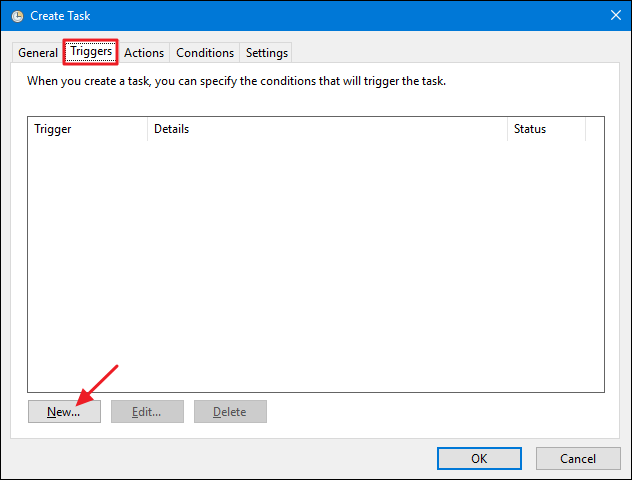
Next, switch to the “Triggers” tab. Click “New” to create a new trigger.
In the New Trigger window, make sure the “Begin the task” dropdown menu is set to “On a schedule.” Set up whatever schedule you like. Here, we’re going with every night at midnight. When you’re done setting up your schedule, click “OK.”
Back in the “Create Task” window, switch over to the “Actions” tab and click “New” to create a new action.
In the “New Action” window, set the “Action” drop-down menu to “Start a program.” Type “shutdown” into the “Program/script” box. In the “Add arguments (optional)” box, type “/S” to have have the task start a basic shutdown command—the same as if you’d clicked the Shut Down button yourself. If you want the command to also force any running applications to close without warning users, type “/S /F” into the “Parameters” box instead. When you’re done, click “OK.”


Back in the “Create Task” window, switch over to the “Conditions” tab. Enable the “Start the task only if the computer is idle for” option and set the timing you’d like. Here, we’re setting the task to kick in only if the computer has been idle for 15 minutes when the shut down time arrives. We’re also setting the task to wait up to one hour for that idle time to happen.

You also have two other options to consider here. Enable the “Stop if the computer ceases to be idle” option to stop the task if you start using your PC. And enable the “Restart if the idle state resumes” to have the task begin measuring idle time again when you stop using your PC. We recommend going ahead and enabling both those options.

Next, switch to the “Settings” tab. Here, you can set your task up so that it will run again every so often if it fails to run successfully. This lets the task shut down your PC if you’re up using it for much longer than you expected to be. Enable the “If the task fails, restart every” option and then set your preferences. Here, we’re having the task restart every thirty minutes and we’re letting it try restarting up to three times. When you’re done, click “OK” to create the task.
Note that you will likely be asked to enter your user account password to finish creating the task. And you can now exit Task Scheduler. From this point on, your PC should shut down automatically at whatever time you scheduled—unless you’re using the PC at that time.

How To Find Wi-Fi Password Using CMD Of All Connected Networks

In this day and age of Internet, the Wi-Fi router and data connection have become a fundamental amenity for every user. One of the first t...