Search This Blog

Monday 28 August 2017

How To Find Wi-Fi Password Using CMD Of All Connected Networks

In this day and age of Internet, the Wi-Fi router and data connection have become a fundamental amenity for every user. One of the first thing that a user does after waking up is switching on his/her Wi-Fi router while there are some users who never switch off their routers. The Internet plays such an important role that people use it for completing their day to day chores as well as for relaxation. Considering that Wi-Fi has become a central part of our life, it is quite easy to forget the Wifi password. So, here is a simple solution to find the connected Wi-Fi network passwords through command prompt.

Here is a Trick to Find Passwords of All Connected Wi-Fi Networks Using CMD

You may be using many WiFi connections through your desktop or laptop. Sometimes, a situation arises, where you may forget the connected Wifi network password. First of all, you should remember that whenever you connect to a WiFi network and enter the password to connect to that network, you are actually making a new WLAN profile of that WiFi network. In essence, every time you make an Internet connection, that particular profile get stored inside the PC/laptop along with the other required details of the WiFi profile.
In this article, we will be learning how to find a particular Wi-Fi password using the command prompt instead of Windows GUI. These steps work even when you are totally offline or you are not connected to the particular WI-Fi profile you are looking the password for.

How to know the WiFi password using cmd:

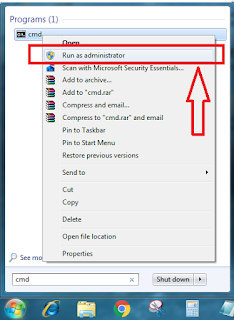
Open the command prompt and run it as administrator. One of the first things to do is to open the command prompt in administrator mode. In older Windows 7/8.1 run PC/Laptops right click on command prompt and choose Run as administrator from 
  • In the next step, we want to know about all the profiles that are stored in our computer. For that type following command in the cmd:

    netsh wlan show profile

    From the above list, I want to find out the password for NETGEAR13  Type the following command to see the password of NETGEAR13 or any other Wi-Fi profile you want.

    netsh wlan show profile WiFi-name key=clear

    The result will be something like this
    Under the key content in security settings, you can see the password. You can use the same command to check and find out the password for each and every profile saved on your PC/laptop.


Friday 18 August 2017

Force Windows to restart in Safe Mode using the System Configuration Utility

Most users looking to boot Windows in safe mode will have a computer that is not working properly. Unfortunately, this method will not help them as it requires the user to have a working computer.


Steps:
1) Press Windows key+R to load the Run dialog box.
2) Type msconfig and press Enter.
3) This will start the System Configuration Utility.
4) On Windows 10, Windows 8, Windows 7 and Windows Vista, go to the Boot tab and tick Safe Boot. On Windows XP, go to the BOOT.INI tab and tick /SAFEBOOT.
5) Click OK.
6) Click on Restart in the following dialog box to boot into Safe Mode.
7) To start your computer normally, untick the Safe Boot option in the System Configuration Utility.

Your computer will restart in Safe mode.

How to Start Windows 10, 8(.1), 7 or XP in Safe Mode

Safe Mode is a special diagnostic mode in which Windows runs with the minimum amount of features. As the features are limited, Windows does not load unnecessary startup items and runs only those files and drivers that are necessary for the basic functioning of the operating system. This allows users to remove recently installed programs that might be preventing Windows from starting correctly. As Windows does not start unnecessary programs while in Safe Mode, it can also be used to remove viruses and malware without risking the infection getting worse.

There are different ways in which you can get into the Safe Mode in Windows. They depend on the version of Windows you are using.
In this article:
  1. Steps for Windows 10, Windows 8 and Windows 8.1 users
  2. Steps for Windows 7, Windows Vista, Windows XP and previous versions
  3. Force Windows to start in Safe mode
  4. Which Safe Mode option should you choose?

Windows 10, Windows 8 and Windows 8.1

The F8 key method does not work on Windows 10, Windows 8 and 8.1. Hence, getting onto Safe Mode requires the following steps:-

If your PC is working properly:
1) On the Windows Start Screen/Menu, type Advanced.
2) Click on Advanced startup options.
3) Under the Advanced Startup heading at the bottom of the General Settings screen, click on Restart now.
4) Your computer will restart and you will be taken to the Advanced Startup Options menu. To easily reach this menu, on Windows start screen, you could choose restart while holding the Shift key.
5) Click on Troubleshoot and then on the Advanced Options button.
6) Now, click on Startup Settings.
7) At the Startup Settings Screen, click on Restart.
8) Your computer will restart to Advanced Boot options from where you can choose a Safe mode option based on your need.
You can also force Windows to start in Safe mode.

If your PC is not working properly:
Windows monitors your PC's startup for problems and when an error is detected, it automatically takes you to the new Recovery mode with the message "Recovery. It looks like Windows didn't load correctly." In this case:-

1) Select Advanced Repair Options and then click on Troubleshoot.
2) Click on the Advanced Options button.
3) Now click on Startup Settings.
4) At the Startup Settings Screen, click on Restart.
5) Your computer will restart to Advance Boot Options from where you can choose a Safe mode option based on your need.

Windows 7, Windows Vista, Windows XP and Previous versions

If you are using these versions of Windows, you can try the following methods.

The Trusted F8 key method
1) Restart your computer if it is on. 
2) Right before the system starts to boot, start tapping the F8 key continuously.
3) This should load the Windows Advanced Options boot menu.
4) Select a Safe Mode option based on your need using the arrow keys and press Enter.
5) Windows will start in Safe mode. To get out of Safe mode, simply restart your computer.

This method should work on Windows 7, Windows Vista, Windows XP, Windows 2003 and Windows ME. However, if it does not, you can always force Windows to boot in Safe Mode if your computer is working "properly".

Faulty Startup Method
If the F8 key method does not take you to the Advanced options boot menu, you could try turning your computer off when it boots into Windows. Upon next restart, Windows will notice that the computer did not boot successfully and take you to the Advanced Options boot menu. Then, select a Safe mode option based on your need. This method is risky and should only be tried as a last resort. It could result in some of your files being deleted which could make your Windows installation unusable.

Thursday 17 August 2017

Disable USB ports on Windows PC via Registry

With this trick, you can disable access to your USB(Universal Serial Bus) ports on your Windows based PC to prevent people from taking out data without permission or spreading viruses through the use of USB (pen and flash) drives. 

To use this trick to disable USB ports, follow the steps given below:-

changes to Data Value 4

  1. Click on Start.
  2. Click on Run. If you cannot find RUN, type it in the search box.
  3. Type "regedit" without quotes. This will launch the Registry Editor.
  4. Navigate to  HKEY_LOCAL_MACHINE\SYSTEM\CurrentControlSet\Services\usbstor.
  5. In the work area, double click on Start.
  6. In the Value Data box, enter 4.
  7. Click on OK.
  8. Close Registry Editor and refresh your desktop.
  9. To re-enable access to your USB ports, enter 3 in the Value Data box in Step 6.


    Try it yourself to make your PC invulnerable from data theft and malware which spread through USB ports. This works on Windows 10, Windows 8, Windows 8.1, Windows 7 and Windows XP.

    Note: This trick also disables access to your USB connected peripheral devices. So, do not use it if you have USB connected keyboard and mouse.

How to reset the Remote Desktop Server Licensing Grace Period on Windows Server 2012 with Remote Desktop Services

So we recently started looking into Terminal Services and RemoteFX to power some of our admin users and move them off to thin clients instead of full blown desktops.  As a trial I begun setting up RDS on one of our Dev machines.  After going through the motions of enabling the Remote Desktop Features and setting up RemoteFX on a Virtual Machine for testing, I found that I couldn’t login via RDP to that machine.  Going back to the RDS host I found the Licensing popup that informed me that the 128 day trial license had expired.  Since this was a test I didn’t want to go using keys to activate or setup a licensing server (purely a PoC for us in IT at this stage).
To reset the grace period there is a registry key that we need to delete. As always when editing the registry, take a backup of the key/s you’re modifying. Navigate to the following location
HKEY_LOCAL_MACHINE\SYSTEM\CurrentControlSet\Control\Terminal Server\RCM\GracePeriod


Now there should be a binary key value (like in the screenshot), you first need to have full access permissions to the folder (or take ownership) and then simply delete that value and reboot the server.  Once back up your RDS Licensing should be back at the start of a 128 Day grace period.  I wouldn’t do this if you have already obtained licensing and should definitely not be used in a production environment.

How to change the listening port for Remote Desktop

Important This section, method, or task contains steps that tell you how to modify the registry. However, serious problems might occur if you modify the registry incorrectly. Therefore, make sure that you follow these steps carefully. For added protection, back up the registry before you modify it. Then, you can restore the registry if a problem occurs. For more information about how to back up and restore the registry, click the following article number to view the article in the Microsoft Knowledge Base:


  1. Start Registry Editor.
  2. Locate and then click the following registry subkey:
    HKEY_LOCAL_MACHINE\System\CurrentControlSet\Control\Terminal Server\WinStations\RDP-Tcp\PortNumber
  3. On the Edit menu, click Modify, and then click Decimal.
  4. Type the new port number, and then click OK.
  5. Quit Registry Editor.
  6. Restart the computer.


    Note When you try to connect to this computer by using the Remote Desktop connection, you must type the new port. Maybe you have to set the firewall to allow the new port number before you connect to this computer by using the Remote Desktop connection.

Sunday 13 August 2017

How to create a protected password folder in windows 7

Copy this on your notepad:

cls
@ECHO OFF
title Folder Private
if EXIST "Control Panel.{21EC2020-3AEA-1069-A2DD-08002B30309D}" goto UNLOCK
if NOT EXIST Private goto MDLOCKER
:CONFIRM
echo Are you sure you want to lock the folder(Y/N)
set/p "cho=>"
if %cho%==Y goto LOCK
if %cho%==y goto LOCK
if %cho%==n goto END
if %cho%==N goto END
echo Invalid choice.
goto CONFIRM
:LOCK
ren Private "Control Panel.{21EC2020-3AEA-1069-A2DD-08002B30309D}"
attrib +h +s "Control Panel.{21EC2020-3AEA-1069-A2DD-08002B30309D}"
echo Folder locked
goto End
:UNLOCK
echo Enter password to unlock folder
set/p "pass=>"
if NOT %pass%== PASSWORD_GOES_HERE goto FAIL
attrib -h -s "Control Panel.{21EC2020-3AEA-1069-A2DD-08002B30309D}"
ren "Control Panel.{21EC2020-3AEA-1069-A2DD-08002B30309D}" Private
echo Folder Unlocked successfully
goto End
:FAIL
echo Invalid password
goto end
:MDLOCKER
md Private
echo Private created successfully
goto End
:End


Watch This Link Video 


https://www.youtube.com/watch?feature=player_detailpage&v=IvngLU-2rsI

How To Find Wi-Fi Password Using CMD Of All Connected Networks

In this day and age of Internet, the Wi-Fi router and data connection have become a fundamental amenity for every user. One of the first t...